Hello… I have a Roland A-80 in excellent condition however the internal battery needs to be replaced. I have both the owner’s manual and service manual however other than the battery mentioned in the parts list, there is no indication exactly where it is located or how to get to it. Before I start hashing around in that beast of a keyboard, does anyone have a suggestion or perhaps know where I can find a video. Much appreciated.
I’m in exactly the same situation (I haven’t changed the battery since I bought my A-80 in 1989!) As I am sure you are aware, page 4 of the “Service Notes” states that it’s a common-or-garden CR2032 and it’s marked on the top-right corner of “MAIN-B BOARD” on page 14 of the same document (when viewed the correct way up!)
If you have a look at https://www.youtube.com/watch?v=OxVX0qfJzns (" Roland A-80 REPAIR: New Blue Display & Amazing Aftertouch") at 2m45s into the video, the nearest board to the camera (on the bottom right of the video) is the “MAIN-B BOARD” - at least all the components seem to be in the correct places - and the battery is clearly there on the top-right corner.
The same video also explains how to open the thing up - I think his diagram originally comes from Modifying the Roland A-80 to make aftertouch more responsive – The Prodigal Sounds.
Hope this helps.
Hello…and thank you for responding. The battery is as plain as day in the video and that many screws to get the thing opened. Have you tried it yet? I am going to give it a shot this week and will let you know who it goes. If I can get it going maybe I’ll start gigging again… LOL!!
Yeah, I did it last night. It’s very easy to do. My A-80 is on a stand, so removing the 15 screws/bolts was just a question of climbing underneath it. To lift the top cover, you only need to remove the (15x) “I” screws - you don’t need to touch the “II” or the “III” screws. The Service Notes says that all 15 screws are the same - this was not true for me. Here’s a diagram I made for myself to note which screws are long (red L x10) and which are short (blue S x5):
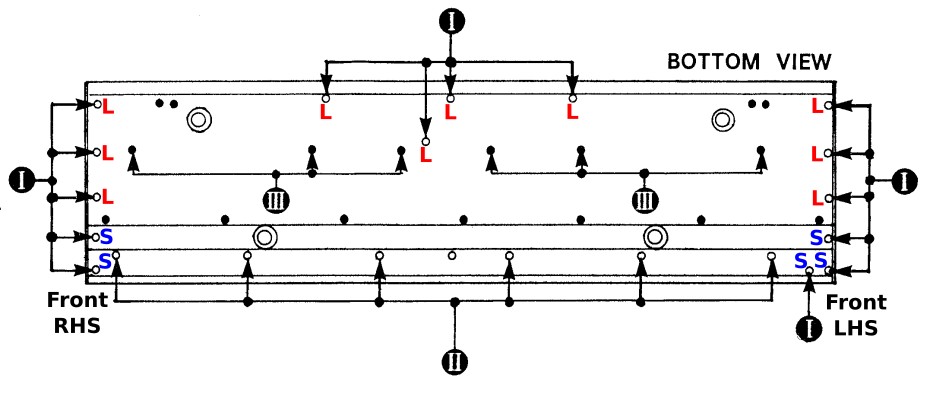
(So basically the 5 short screws are at the front - 3 on the left and 2 on the right.)
Once you’ve removed those screws, the top cover lifts easily, and the PCB is attached to it. I couldn’t work out whether I needed to remove the battery clamp bracket, so I just pulled the right-hand side of the clip forwards and gently levered the battery out (to the right) using a thin piece of rigid plastic.
Before changing the battery, I was getting garbage settings in all of my patches every time I switched the keyboard off. Now that I’ve changed the battery, a quick “factory reset” and it’s as good as new! ![]()
![]()